E-commerce platform architecture diagram
An online shop has very uneven parts. Browsing and search take most of the traffic and must be fast; checkout takes far less but must never lose an order or charge a card twice.
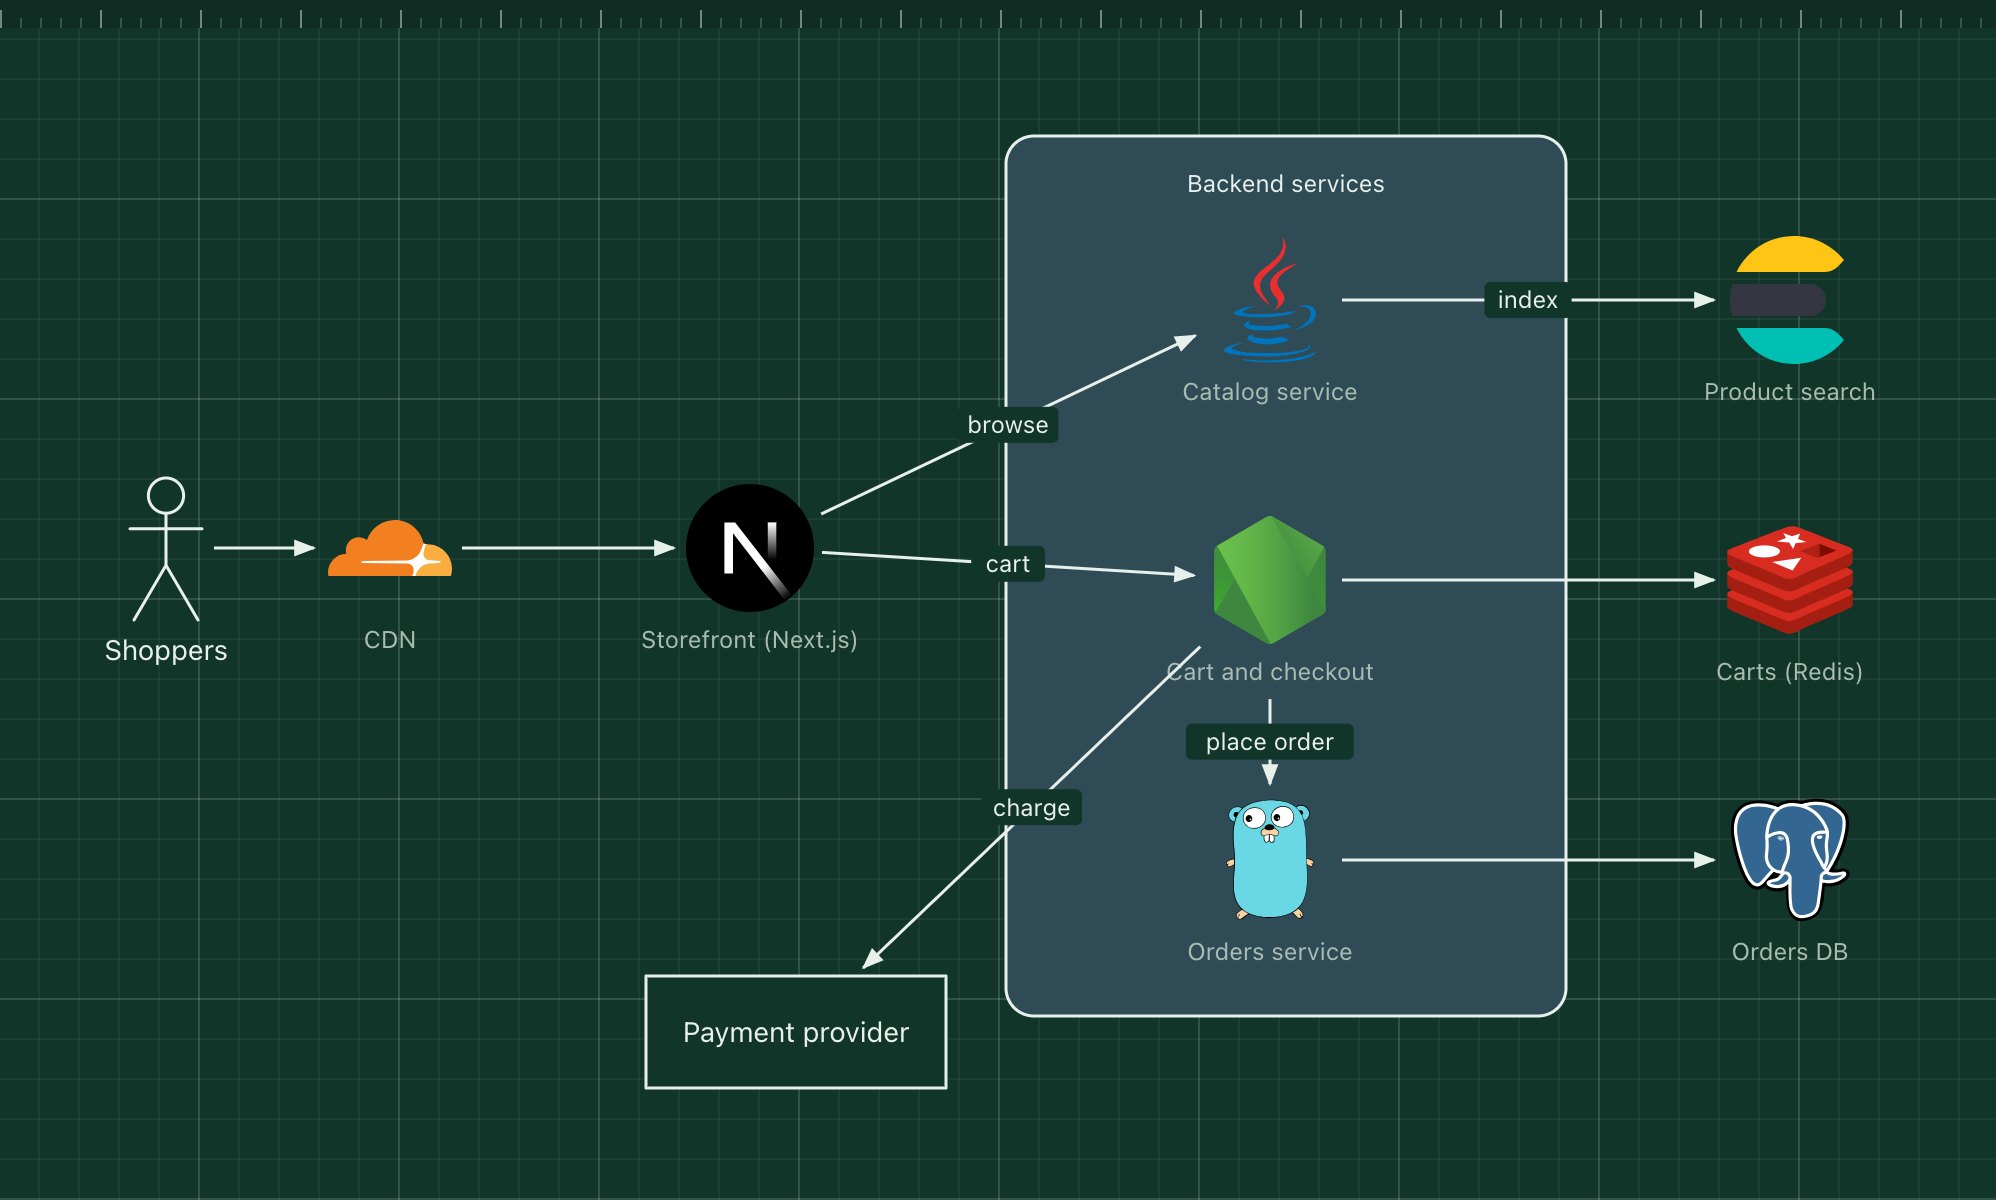
This template splits the shop along those lines: a cached storefront, a catalog backed by a search index, a cart and checkout service with fast storage, and an orders service with a transactional database.
What's in the diagram
- CDN
- Caches product pages and images close to shoppers, which absorbs most of the browsing traffic.
- Storefront (Next.js)
- Renders product and category pages, mostly ahead of time, and calls the backend for search, cart and checkout.
- Catalog service
- Owns products, prices and stock levels, and keeps the search index up to date.
- Product search (Elasticsearch)
- Full-text search, filters and facets such as size, brand and price.
- Cart and checkout
- Keeps carts in Redis, calculates totals and taxes, and charges the payment provider.
- Orders service
- Turns a paid cart into an order in PostgreSQL and starts fulfilment.
How a request flows through it
- A shopper browses; pages and images come from the CDN, and search queries go to the catalog service.
- Adding items updates the cart in Redis, so it survives page reloads without database writes.
- At checkout, the cart service asks the payment provider to charge the card, using an idempotency key so a retry cannot charge twice.
- Once the payment succeeds, it asks the orders service to create the order.
- The orders service stores it in PostgreSQL and triggers confirmation and fulfilment.
When to use this architecture
Use it for a custom shop that has outgrown a hosted platform, or as a map of how a hosted platform works inside. A small shop is usually better served by Shopify or WooCommerce; build your own when your catalog, pricing or checkout really differ from what they offer.
Ways to adapt the template
- Add a queue between orders and fulfilment, warehouse and email (see the event-driven template).
- Listen to the payment provider's webhooks instead of trusting only the redirect back.
- Add a recommendations service fed by order events.
- Put the catalog behind a GraphQL gateway for web and mobile apps.
How to customise this diagram
- Open your copy. Click Open in the editor. The template opens as your own project, saved in your browser. Nothing is uploaded.
- Rename the parts. Double-click any label, such as “CDN”, type your own name, then click outside it. Arrow labels work the same way.
- Swap a technology. Select CDN and press Delete. Search the icon palette for the technology you use, drag it onto the board, and reconnect it by dragging its arrow handle onto the next component.
- Add what is missing. Drag more icons or shapes onto the board. Shapes include databases, servers, users, queues, mail, alerts and scheduled jobs.
- Adjust the zones. Zones are rounded rectangles with a fill colour. Resize them to fit, pick another colour from the selection bar, and press [ to send a zone behind the components.
- Export or share. Save the diagram as a PNG with the camera button, download the project as JSON with Export, or copy a link with Share.